Unit 7 · Application Software · 29 min read
Word Processing
What the syllabus asks for 6
- Word processor: features and examples
- Creating, saving, opening and printing a document
- Editing: select, cut, copy, paste, undo, find and replace, spelling and grammar check
- Formatting: font, paragraph, bullets and numbering, page layout, header, footer and page numbers
- Tables, pictures, shapes and WordArt
- Mail merge
Applications, notices, letters, project reports, CVs and question papers are all typed in a word processor. It lets you write, correct and decorate a document on the screen before a single sheet is printed, and change it again next year without retyping a word. This lesson teaches the word processor as a set of real tasks: creating, saving and printing a document; editing it; formatting text, paragraphs and pages; adding tables, pictures, shapes and WordArt; and producing a hundred personalised letters at once with mail merge. Commands are given for Microsoft Word (Microsoft 365), with the LibreOffice Writer way in brackets, so you can follow on either.
Theory questions ask you to define a word processor, list features, name examples, and explain terms such as font, alignment, margin, header, footer, mail merge. Short questions ask for shortcut keys (Ctrl + B, Ctrl + H …), the difference between Cut and Copy or Save and Save As, and which tab holds a command. Long questions ask for steps: insert a table, add page numbers, use Find and Replace, or perform a mail merge. The practical exam asks you to produce a formatted document — so practise every worked example at a computer.
7.1 Word processor: features and examples
A word processor is application software used to create, edit, format, save and print text documents such as letters, notices, reports and applications. Working on documents this way is called word processing.
Examples: Microsoft Word (part of Microsoft 365), LibreOffice Writer (free and open source), Google Docs (works in a web browser), WPS Writer and Apple Pages. Simple editors such as Notepad handle only plain text without formatting, so they are text editors, not word processors. (WordPad, a small word processor, was removed from Windows 11 in 2024.)
Features of a word processor
- Word wrap: text moves to the next line by itself when a line is full.
- Editing: insert, delete, select, cut, copy, paste and move text; undo and redo mistakes.
- Find and Replace: find a word anywhere and change it everywhere at once.
- Spelling and grammar check and AutoCorrect of common typing errors.
- Formatting: fonts, sizes, colours, bold, italic, underline; alignment, line spacing, indents, bullets and numbering; margins, page size and orientation; headers, footers and page numbers.
- Objects: tables, pictures, shapes, WordArt, charts, symbols and equations.
- Mail merge: many personalised letters from one document and a list.
- Templates for letters, CVs and reports; word count; print preview.
- Saving in many formats (DOCX, ODT, PDF) and, in Microsoft 365 and Google Docs, sharing and editing together online.
| Typewriter | Word processor |
|---|---|
| a mistake means retyping the page | mistakes are corrected on screen before printing |
| one copy at a time (carbon copies are faint) | any number of identical copies |
| nothing is saved | documents are saved and reused |
| one typeface, no pictures | many fonts, colours, tables and pictures |
| no spelling check | spelling and grammar checked automatically |
Word processors type Nepali in Unicode fonts such as Kalimati, Mangal or Nirmala UI. Add the Nepali keyboard in Windows (Settings → Time & language → Language & region), or use a Romanized Nepali Unicode keyboard. Avoid old non-Unicode fonts such as Preeti for documents you will share: on a computer without that font the text turns into English letters.
The word processor window
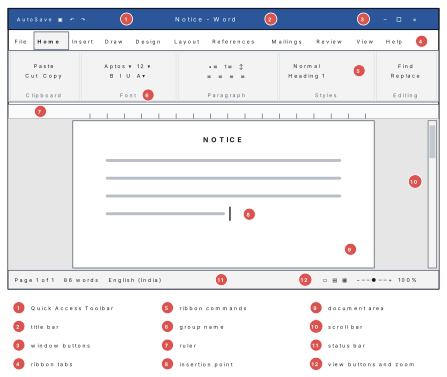
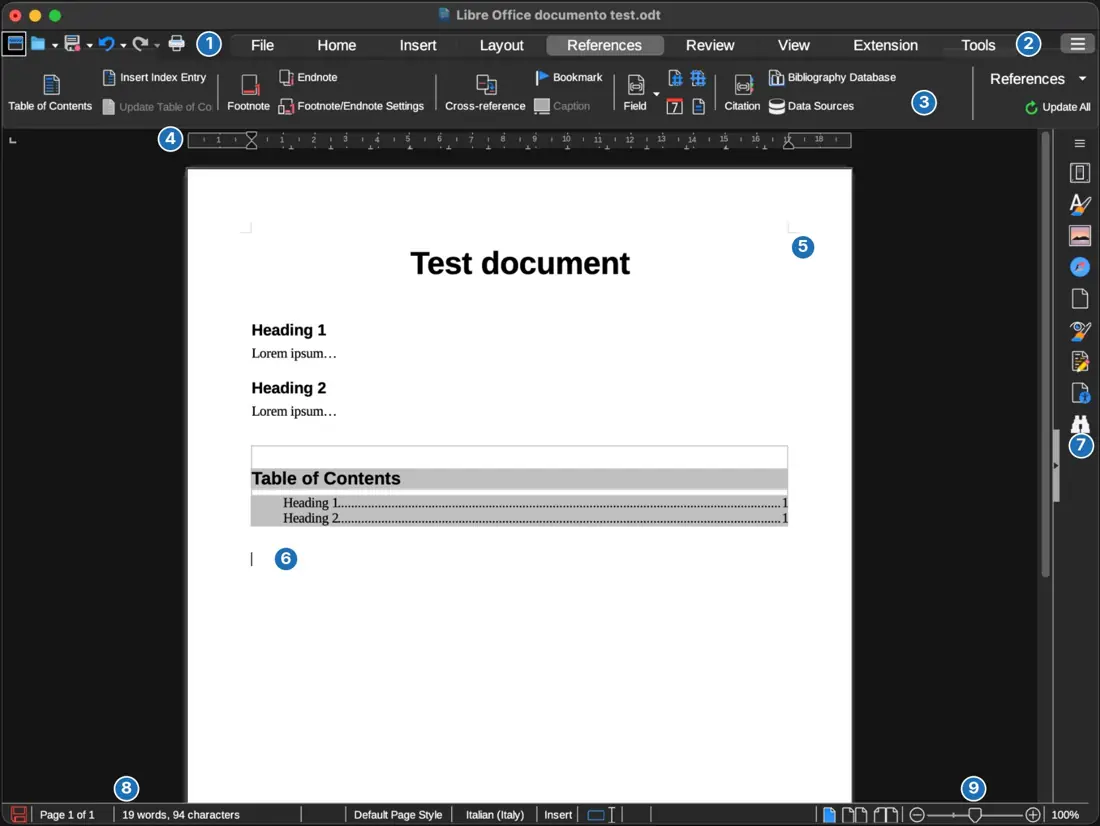
The ribbon replaces old drop-down menus. It has tabs (File, Home, Insert, Draw, Design, Layout, References, Mailings, Review, View, Help); each tab has groups of related commands (on the Home tab: Clipboard, Font, Paragraph, Styles, Editing). A small arrow at the corner of a group, the dialog box launcher, opens a dialog with more choices. The File tab opens the Backstage view for New, Open, Save, Save As, Print and Export. The blinking vertical line is the insertion point (cursor): text appears where it is.
7.2 Creating, saving, opening and printing a document
Create a new document. Open Word and click Blank document, or press Ctrl + N. (Writer: File → New → Text Document.) Start typing. Press Enter only at the end of a paragraph — word wrap starts new lines for you. Press Ctrl + Enter to start a new page.
Save a document for the first time (File → Save As, or F12):
1. Choose the location — This PC → Documents or a folder of your own.
2. Type a meaningful file name, e.g. Science Exhibition Notice.
3. Keep Save as type: Word Document (*.docx) (Writer saves .odt by
default; choose Word 2007–365 to share with Word users).
4. Click Save. The name appears in the title bar.
After that, press Ctrl + S (Save) often while you work. Save As makes a new copy with a different name, place or format; Save updates the same file. To make a PDF that looks the same on every computer: File → Save As → type PDF, or File → Export. (Writer: File → Export as PDF.) With Microsoft 365, files saved to OneDrive are saved automatically (AutoSave).
| Save | Save As |
|---|---|
| saves changes into the same file | saves a copy under a new name, place or format |
| Ctrl + S | F12 in Word; Ctrl + Shift + S in Writer |
| the first time, it opens the Save As box | always opens the Save As box |
Open a document: File → Open (Ctrl + O) → Browse → choose the file → Open. Recent files are listed on the Home and Open screens.
Print a document (File → Print, Ctrl + P): the right side shows a print preview of every page. Set:
- Copies — how many copies;
- Printer — which printer;
- Pages — Print All Pages, Print Current Page, or a list such as
1-3, 6(pages 1, 2, 3 and 6); - One sided / two sided, Collated, Orientation (portrait or landscape), paper size (A4 in Nepal) and margins;
- then click Print.
Problem. A 12-page project report is printed with Pages: 1-3, 6, 9-10
and Copies: 3. (a) Which pages print, and how many printed pages come out
in all? (b) If Print on Both Sides is chosen, how many sheets of paper are
used?
Solution. (a) 1-3 means pages 1, 2 and 3; then 6; then 9-10 means 9 and
10. So pages 1, 2, 3, 6, 9, 10 print — 6 pages per copy. For 3 copies:
6 × 3 = 18 printed pages.
(b) Two-sided printing puts 2 pages on each sheet: 6 ÷ 2 = 3 sheets per copy,
so 3 × 3 = 9 sheets.
7.3 Editing: select, cut, copy, paste, undo, find and replace, spelling and grammar check
Selecting text. You must select text before you change it; selected text is highlighted.
| To select | Do this |
|---|---|
| a word | double-click it |
| a paragraph | triple-click it |
| any part | drag the mouse over it, or hold Shift and press the arrow keys |
| a line | click in the left margin beside it |
| the whole document | Ctrl + A |
Cut, copy and paste. Selected text can be moved or duplicated through the clipboard, a temporary store in memory.
| Command | Shortcut | Result |
|---|---|---|
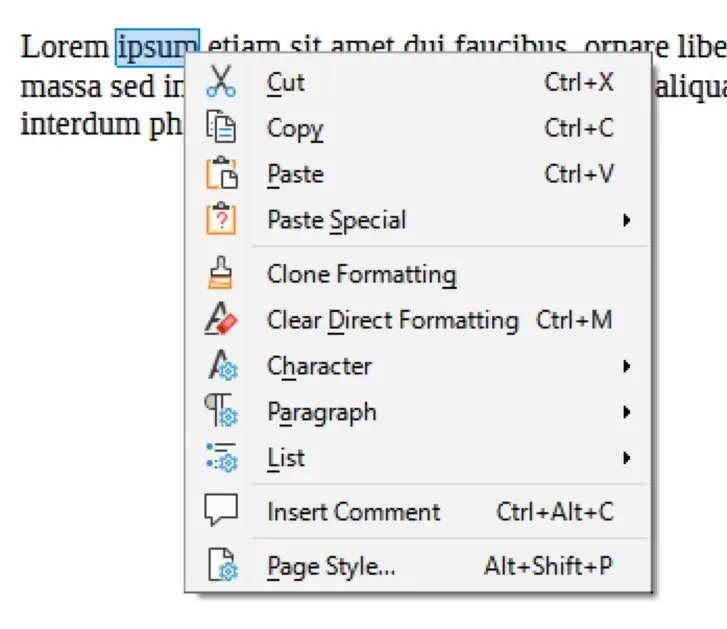
| Cut | Ctrl + X | removes the selection and keeps it on the clipboard |
| Copy | Ctrl + C | leaves the selection and puts a copy on the clipboard |
| Paste | Ctrl + V | inserts the clipboard contents at the insertion point |
| Undo | Ctrl + Z | cancels the last action (press again for earlier ones) |
| Redo | Ctrl + Y | brings back what Undo cancelled |
Cut + Paste moves text; Copy + Paste duplicates it. You can also drag selected text to a new place. Word's Paste Options (Ctrl after pasting, or Home → Paste ▾) let you Keep Source Formatting, Merge Formatting or Keep Text Only — the last is useful when copying from a website.
Find (Ctrl + F). In Word, Ctrl + F opens the Navigation pane; type a word and every place it occurs is highlighted and listed.
Find and Replace (Ctrl + H). Home → Editing → Replace. (Writer: Edit → Find and Replace, Ctrl + H.) 1. Type the word to look for in Find what. 2. Type the new word in Replace with. 3. Click More >> for options such as Match case (capitals must match) and Find whole words only (do not match parts of longer words). 4. Click Find Next and Replace to change one at a time, or Replace All to change every one; Word reports how many replacements it made.
Problem. A document reads: The cat sat near the category board; the cat was black. (a) What does it become if every "cat" is replaced by "dog" with Replace All and no options? (b) What happens if Find whole words only is ticked?
Solution. (a) Without the option, Word also finds the "cat" inside "category": 3 replacements, giving The dog sat near the dogegory board; the dog was black. — a mistake. (b) With Find whole words only, "category" is skipped: 2 replacements, giving The dog sat near the category board; the dog was black. Always think about the options before pressing Replace All.
Spelling and grammar. Word underlines possible spelling mistakes with a red wavy line and grammar problems with a blue double line. Right-click an underlined word to choose a correction, Ignore it, or Add to Dictionary (useful for Nepali names such as Bhaktapur). To check the whole document: Review → Editor, or press F7. (Writer: Tools → Spelling, F7.) The checker is a help, not a teacher: "I red the book" passes the spelling check because red is a real word.
7.4 Formatting: font, paragraph, bullets and numbering, page layout, header, footer and page numbers
Formatting means changing how text and pages look without changing what they say.
Character (font) formatting
Select the text, then use Home → Font (Writer: the Formatting toolbar, or Format → Character).
| Formatting | How | Shortcut |
|---|---|---|
| Font (typeface) | Font box: Aptos, Times New Roman, Arial, Kalimati | — |
| Font size (in points) | Font Size box, or grow/shrink buttons | Ctrl + ] / Ctrl + [ |
| Bold, italic, underline | B, I, U buttons | Ctrl + B, Ctrl + I, Ctrl + U |
| Font colour, highlight | A▾ and highlighter buttons | — |
| Superscript, subscript | x², x₂ buttons (for 10², H₂O) | Ctrl + Shift + = , Ctrl + = |
| Change case | Aa▾: Sentence case, UPPERCASE, lowercase, Capitalize Each Word | Shift + F3 |
| All font options | dialog box launcher of the Font group | Ctrl + D |
A font is a design of letters. Its size is measured in points (72 points = 1 inch): body text is usually 11 or 12 pt and headings larger. New documents in Microsoft 365 use the Aptos font; LibreOffice uses Liberation Serif.
Paragraph formatting
A paragraph is everything typed before you press Enter. Click inside a paragraph and use Home → Paragraph (Writer: Format → Paragraph).
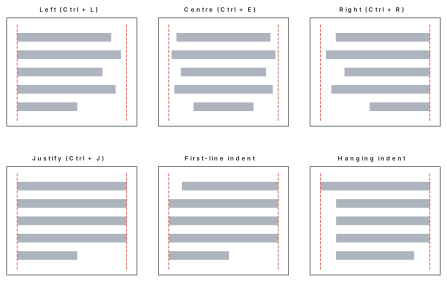
- Alignment: left (Ctrl + L), centre (Ctrl + E), right (Ctrl + R) or justify (Ctrl + J).
- Line spacing: the ↕ button — 1.0, 1.15, 1.5, 2.0 lines; spacing before and after a paragraph adds space between paragraphs.
- Indents: the Increase/Decrease Indent buttons move a paragraph in from the margin; the ruler's markers or the Paragraph dialog (Special: First line or Hanging) set a first-line or hanging indent.
- Borders and shading put a box or a background colour behind a paragraph.
Do not centre a title by pressing the spacebar many times, and do not press Enter at the end of every line. The text will jump out of place as soon as the font or margins change. Use the alignment buttons, line spacing and Ctrl + Enter for a new page.
Bullets and numbering
Select the lines and click Bullets (•≡) or Numbering (1≡) in Home → Paragraph; the arrow beside each button chooses the symbol or the number style (1, 2, 3 · a, b, c · i, ii, iii). Multilevel List makes sub-points; press Tab to go one level in and Shift + Tab to come back. (Writer: Format → Bullets and Numbering, or the toolbar buttons.) Use bullets when the order does not matter and numbers when it does, as in steps.
Page layout
Layout tab (Writer: Format → Page Style):
- Margins: the blank space around the text. Normal is 2.54 cm (1 inch) on every side.
- Orientation: Portrait (tall) or Landscape (wide).
- Size: A4 (21 cm × 29.7 cm), the standard paper in Nepal.
- Columns: text in two or three columns, as in a newspaper.
- Breaks: a page break starts a new page; a section break lets one part of a document have different margins or orientation.
Header, footer and page numbers
A header is text that repeats at the top of every page (for example the school's name); a footer repeats at the bottom (for example the page number or date).
- Insert → Header (or Footer) → choose a style, or double-click the top or bottom margin of a page.
- Type the text; it appears on every page.
- Insert → Page Number → Bottom of Page → Plain Number 2 puts a centred number at the foot of every page; Word counts the pages for you.
- Tick Different First Page on the Header & Footer tab to leave the cover page without a number.
- Click Close Header and Footer (or double-click the body).
(Writer: Insert → Header and Footer → Header → Default Page Style; then Insert → Page Number, or Insert → Field → Page Number.)
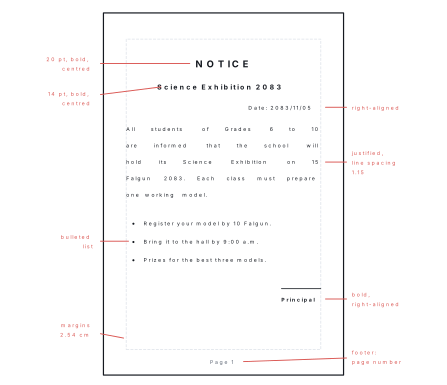
Problem. Type and format a notice for a school Science Exhibition: a title, a subtitle, the date on the right, one justified paragraph, three bulleted points, the principal's signature and a page number in the footer.
Solution.
1. Ctrl + N for a new document. Layout → Margins → Normal; Size → A4;
Orientation → Portrait.
2. Type all the text first, pressing Enter only at the end of each paragraph.
3. Select the title NOTICE: Font size 20, Ctrl + B, Ctrl + E.
4. Select the subtitle: size 14, bold, centred.
5. Click in the date line and press Ctrl + R (right-align).
6. Select the paragraph: Ctrl + J (justify) and line spacing 1.15.
7. Select the three points and click Bullets.
8. Select the signature line Principal: bold, right-aligned.
9. Insert → Page Number → Bottom of Page → Plain Number 2; Close Header and
Footer.
10. Ctrl + S, name it Science Exhibition Notice, then Ctrl + P to preview and
print.
7.5 Tables, pictures, shapes and WordArt
Tables
A table arranges information in rows (across) and columns (down); each box is a cell. Tables suit class routines, marks lists and price lists.
- Click where the table should go. Insert → Table and drag across the grid to choose, say, 5 columns × 4 rows — or click Insert Table… and type the number of columns and rows. (Writer: Table → Insert Table, Ctrl + F12.)
- Type in the cells; press Tab to go to the next cell (Tab in the last cell adds a new row).
- The Table Design tab changes the style, shading and borders.
- The Layout tab (next to Table Design) has Insert Above/Below/Left/
Right, Delete, Merge Cells (join selected cells into one), Split
Cells, AutoFit, alignment of text in cells, and Formula (for
example
=SUM(ABOVE)to total a column of numbers).
Problem. A class routine table is inserted with 5 columns and 4 rows. (a) How many cells does it have? (b) The 5 cells of the top row are merged to hold the title Class 8 Routine. How many cells are there now? (c) One more row is inserted below. How many cells in all?
Solution. (a) 5 × 4 = 20 cells. (b) Merging 5 cells makes 1 cell, so 20 − 5 + 1 = 16 cells. (c) A new row has 5 cells: 16 + 5 = 21 cells.
Pictures
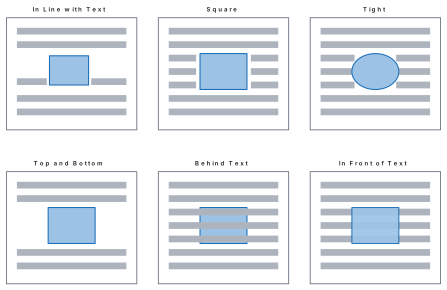
Insert → Pictures → This Device, find the photo and click Insert. (Writer: Insert → Image.) Drag the round handles at the corners to resize it without stretching it out of shape; the Picture Format tab can crop it, add a border or a style. Wrap Text decides how text flows around it.
Shapes and WordArt
Shapes: Insert → Shapes offers lines, arrows, rectangles, circles, stars, flowchart symbols and callouts. Click a shape, then drag on the page to draw it (hold Shift for a perfect square or circle). The Shape Format tab changes its fill, outline and effects; right-click → Add Text writes inside it. (Writer: Insert → Shape, or the Drawing toolbar.)
WordArt is decorative text with colour, outline, shadow and curved effects, used for titles of posters and certificates. Insert → WordArt (in the Text group) → choose a style → type the words. The Shape Format tab's Text Effects → Transform bends it into an arch or a wave. (Writer: Insert → Fontwork.) Use WordArt sparingly: one decorative title is enough.
| Object | Insert | Format tab | Writer |
|---|---|---|---|
| Table | Insert → Table | Table Design, Layout | Table → Insert Table |
| Picture | Insert → Pictures | Picture Format | Insert → Image |
| Shape | Insert → Shapes | Shape Format | Insert → Shape |
| WordArt | Insert → WordArt | Shape Format | Insert → Fontwork |
7.6 Mail merge
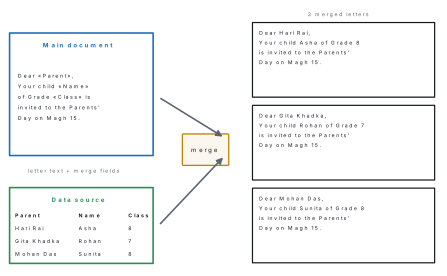
Suppose the school must send an invitation to the parents of 32 students. The letter is the same except for each parent's name, the student's name and the class. Typing 32 letters wastes time and invites mistakes. Mail merge types them all at once.
Mail merge is a feature of a word processor that combines a main document with a data source to produce many personalised copies — letters, envelopes, labels, certificates or emails — each filled with the details of one person from the list.
Mail merge needs three things:
- the main document — the text that is the same for everyone, with merge fields such as «Name» where the details should go;
- the data source — a table of names and details (a Word table, an Excel or Calc sheet, or Outlook contacts), with one row (record) per person and one column (field) per detail;
- the merged documents — one finished copy for every row.
Steps in Microsoft Word
- Type the letter, leaving out the details that change.
- Mailings → Start Mail Merge → Letters.
- Mailings → Select Recipients → Use an Existing List (choose an Excel
file such as
parents.xlsxand its sheet) or Type a New List (type the names in Word's own table). - Click where a detail belongs, then Insert Merge Field and choose the field, e.g. «Parent». Repeat for «Name» and «Class».
- Preview Results and use the arrows to check each record; Edit Recipient List can untick people who should not get a letter.
- Finish & Merge → Edit Individual Documents (makes one new document with every letter), Print Documents, or Send Email Messages.
Word also offers a guided Step-by-Step Mail Merge Wizard under Start Mail Merge. In LibreOffice Writer: Tools → Mail Merge Wizard, using a Calc sheet as the data source.
Uses: invitations and notices to parents, report cards and certificates with each student's name, fee reminders, envelopes and address labels, and greeting letters from businesses to customers.
Problem. A school's data source sheet has 32 rows of parents, with the columns Parent, Name, Class and Fee_Due. (a) How many letters does Finish & Merge make? (b) In Edit Recipient List the teacher unticks 4 parents who have already paid. How many letters now? (c) Write the merge fields for the line "Please pay Rs ... for your child ... by Magh 15."
Solution. (a) One letter per row: 32 letters. (b) 32 − 4 = 28 letters. (c) Please pay Rs «Fee_Due» for your child «Name» by Magh 15. — the main document holds this one line; the merge fills in each parent's amount and child's name.
At the lab, make these four documents and save each in a folder named after you: (1) the notice of Worked example 7.3; (2) your class routine as a table with a merged title row; (3) a one-page report on a festival with one picture wrapped Square, a WordArt title, a header with your school's name and page numbers in the footer; (4) a mail-merged invitation to five friends from a data table you type yourself. Print or export each as PDF.
Ctrl + X / C / V cut, copy, paste · Ctrl + Z / Y undo, redo · Ctrl + B / I / U bold, italic, underline · Ctrl + L / E / R / J left, centre, right, justify · Ctrl + S / O / P / N save, open, print, new · Ctrl + F / H find, replace. In an exam, write the tab and command too, e.g. Insert → Page Number.
Chapter summary
- A word processor creates, edits, formats, saves and prints documents: Microsoft Word, LibreOffice Writer, Google Docs. Features include word wrap, find and replace, spell check, tables, pictures and mail merge.
- Word's window: title bar, Quick Access Toolbar, ribbon (tabs → groups → commands), ruler, document area, insertion point, scroll bars, status bar.
- New Ctrl + N, Open Ctrl + O, Save Ctrl + S (Save As F12 makes a
new copy), Print Ctrl + P with copies, pages (
1-3, 6) and sides; DOCX for Word, ODT for Writer, PDF for sharing. - Editing: select, Cut Ctrl + X (move), Copy Ctrl + C, Paste Ctrl + V, Undo Ctrl + Z, Find Ctrl + F, Replace Ctrl + H (match case, whole words), spelling and grammar F7.
- Formatting: font, size (points), bold/italic/underline; alignment (Ctrl + L/E/R/J), line spacing, indents; bullets and numbering; margins (Normal 2.54 cm), orientation, A4 size; header (top), footer (bottom), page numbers (Insert → Page Number).
- Objects: tables (rows × columns = cells; merge, split), pictures (Wrap Text), shapes and WordArt (Writer: Fontwork).
- Mail merge = main document + data source → one merged copy per row (Mailings → Start Mail Merge → Select Recipients → Insert Merge Field → Preview → Finish & Merge).
Practice questions
Group A — Objective (1 mark each)
- Which of these is a word processor? [1]aMicrosoft ExcelbLibreOffice WritercGoogle ChromedVLC
- The default file extension of a Microsoft Word document is [1]a.xlsxb.docxc.pptxd.odt
- The shortcut key for Undo is [1]aCtrl + YbCtrl + UcCtrl + ZdCtrl + X
- Text that repeats at the top of every page is the [1]afooterbheadercmargindfootnote
- Ctrl + H opens [1]aFind and ReplacebHelpcHeaderdHyperlink
- Which alignment makes text touch both the left and right margins? [1]aleftbcentrecrightdjustify
- The Mail Merge commands are on the [1]aInsert tabbMailings tabcReview tabdView tab
- In Word, a red wavy underline below a word shows a possible [1]agrammar mistakebspelling mistakechyperlinkdbold word
- Printing with Pages:
2-4, 7prints [1]a2 pagesb3 pagesc4 pagesd7 pages - Decorative text with curved and shadow effects is [1]aWordArtba footerca tableda bullet
- A table of 6 columns and 5 rows has [1]a11 cellsb25 cellsc30 cellsd36 cells
- In LibreOffice Writer, WordArt is called [1]aFontworkbSmartArtcClipArtdTextArt
Answers to Group A
1. (b) — Writer is LibreOffice's word processor.
2. (b) — .docx; .odt is Writer's format.
3. (c) — Ctrl + Z undoes; Ctrl + Y redoes.
4. (b) — the header; the footer is at the bottom.
5. (a) — Find and Replace.
6. (d) — justify spreads text to both margins.
7. (b) — Mailings tab.
8. (b) — red for spelling; blue double line for grammar.
9. (c) — pages 2, 3, 4 and 7.
10. (a) — WordArt.
11. (c) — 6 × 5 = 30.
12. (a) — Insert → Fontwork.
Group B — Short answer (2 marks each)
- What is a word processor? Name two examples. [2]
- Write any four features of a word processor. [2]
- Differentiate between Save and Save As. [2]
- Differentiate between Cut and Copy. [2]
- Write the steps to find the word "Kathmandu" and replace it with "Lalitpur" everywhere in a document. [2]
- What are header and footer? Give one use of each. [2]
- Write the steps to insert page numbers at the bottom of every page in Word. [2]
- Write the steps to insert a table of 4 columns and 6 rows. [2]
- What is meant by text wrapping? Name two wrapping options. [2]
- Write the shortcut keys for: bold, centre alignment, paste and print. [2]
Answers to Group B
1. A word processor is application software used to create, edit, format, save and print text documents. Examples: Microsoft Word, LibreOffice Writer, Google Docs (any two).
2. Any four: word wrap; editing with cut, copy, paste and undo; find and replace; spelling and grammar check; formatting of fonts, paragraphs and pages; tables, pictures and shapes; headers, footers and page numbers; mail merge; saving as PDF; templates.
3. Save stores the changes in the same file (Ctrl + S); the first time, it asks for a name. Save As stores a new copy with a different name, location or format (F12), leaving the original unchanged.
4. Cut (Ctrl + X) removes the selected text and keeps it on the clipboard, so pasting moves it. Copy (Ctrl + C) leaves the text where it is and puts a copy on the clipboard, so pasting duplicates it.
5. Press Ctrl + H (Home → Editing → Replace). Type Kathmandu in Find what and Lalitpur in Replace with; under More, tick Find whole words only if needed; click Replace All, then OK.
6. A header is text at the top margin that repeats on every page, e.g. the school's name; a footer is text at the bottom margin that repeats on every page, e.g. the page number or date.
7. Insert tab → Page Number → Bottom of Page → choose a style such as Plain Number 2; then click Close Header and Footer.
8. Place the cursor; Insert → Table → Insert Table…; type 4 in Number of columns and 6 in Number of rows; click OK. (In Writer: Table → Insert Table.)
9. Text wrapping decides how the text of the document flows around a picture or shape. Options (any two): In Line with Text, Square, Tight, Top and Bottom, Behind Text, In Front of Text.
10. Bold: Ctrl + B; centre: Ctrl + E; paste: Ctrl + V; print: Ctrl + P.
Group C — Long answer (4 marks each)
- Explain any four parts of the Microsoft Word window with a labelled sketch. [4]
- What is mail merge? Write the steps to prepare invitation letters for ten parents with mail merge. [1+3]
- Write the steps to(a) save a new document with the name Report in the Documents folder, and(b) print pages 1 to 3 of it twice. [2+2]
- Explain any four types of paragraph formatting with examples. [4]
- A 20-page document is printed with Pages:
1-5, 11, 15-16and Copies: 4 on both sides of the paper. How many pages print per copy, how many printed pages in all, and how many sheets are used? Show your working. [4]
Answers to Group C
1. Sketch as in Figure 1. Any four: Title bar — shows the document's name and the program. Quick Access Toolbar — Save, Undo, Redo always at hand. Ribbon — tabs (Home, Insert, Layout …) with groups of commands. Ruler — shows and sets margins, indents and tab stops. Document area — where text is typed; the insertion point marks the typing position. Scroll bars — move through the document. Status bar — page number, word count and language; zoom slider — enlarge or shrink the view.
2. Mail merge combines a main document with a data source to produce a personalised copy for every person (1 mark). Steps: type the invitation, leaving blanks for the details; Mailings → Start Mail Merge → Letters; Select Recipients → Type a New List and enter the ten parents' names and their children's names (or Use an Existing List from Excel); place the cursor and Insert Merge Field «Parent», «Name» in the right places; Preview Results to check; Finish & Merge → Edit Individual Documents (or Print Documents). Ten letters are produced.
3. (a) File → Save As (or F12) → choose This PC → Documents → type Report
in File name → keep the type Word Document (*.docx) → Save. (b) File → Print
(Ctrl + P) → in Pages type 1-3 → set Copies to 2 → choose the printer →
Print.
4. Any four. Alignment: the position of lines between the margins — left, centre (a title), right (a date), justify (a report). Line spacing: the space between lines — 1.0 for normal text, 1.5 or 2.0 for drafts. Indentation: moving a paragraph in from the margin — first-line indent in a story, hanging indent in a list of references. Spacing before and after: space between paragraphs. Bullets and numbering: lists of points or steps. Borders and shading: a box or background colour behind a paragraph.
5. 1-5 gives pages 1, 2, 3, 4, 5 (5 pages); 11 (1 page); 15-16 gives
15 and 16 (2 pages). Pages per copy = 5 + 1 + 2 = 8.
Printed pages = 8 × 4 = 32.
Both sides: 8 ÷ 2 = 4 sheets per copy, so 4 × 4 = 16 sheets.
Practise more: Computer Science question bank