Unit 9 · Application Software · 25 min read
Presentation Software
What the syllabus asks for 6
- Presentation software: features and examples
- Creating a presentation: slides, layouts, themes and placeholders
- Inserting text, pictures, tables, charts, audio and video
- Transitions and animations
- Slide views, the slide master and running a slide show
- Designing an effective presentation
In a science fair, a school assembly or a class project, you often have to explain something to a group of people. A presentation — a set of slides shown on a screen or projector while you speak — helps them follow you: the key points, pictures, charts and short videos appear exactly when you need them. This lesson teaches presentation software as a practical skill: making slides with layouts, themes and placeholders; adding text, pictures, tables, charts, sound and video; adding transitions and animations; using the slide views and the slide master; running the show; and, most important, designing slides that people can actually read. Commands are given for Microsoft PowerPoint (Microsoft 365), with LibreOffice Impress in brackets.
Expect: define presentation software, slide, layout, theme, placeholder, transition, animation, slide master; name examples; list features; the difference between a transition and an animation, and between Normal and Slide Sorter view; steps to insert a picture, chart, audio or video, add a transition to all slides, or start the slide show (F5); and rules for an effective presentation. A practical test asks for a short presentation on a topic such as "Tourism in Nepal".
9.1 Presentation software: features and examples
Presentation software is application software used to create a series of slides containing text, pictures, charts, sound and video, and to show them one after another on a screen or through a projector to support a talk. A file of slides is called a presentation (or slide deck).
Examples: Microsoft PowerPoint, LibreOffice Impress (free and open source), Google Slides (works in a browser), Apple Keynote, Canva and WPS Presentation.
Features of presentation software
- ready-made layouts and themes (designs) for slides;
- placeholders for titles, text, pictures, tables, charts and video;
- multimedia: pictures, audio, video, icons, shapes and SmartArt diagrams;
- transitions between slides and animations of objects on a slide;
- several views: Normal, Outline, Slide Sorter, Notes Page, Reading View;
- a slide master that changes every slide at once;
- speaker notes and Presenter View for the speaker;
- rehearse timings, self-running shows and export to PDF or video;
- sharing and editing together online (PowerPoint for the web, Google Slides).
Uses: classroom teaching and student projects, school assemblies and parents' meetings, business and NGO reports, training workshops, wedding and birthday slide shows, and information screens in banks, hotels and hospitals.
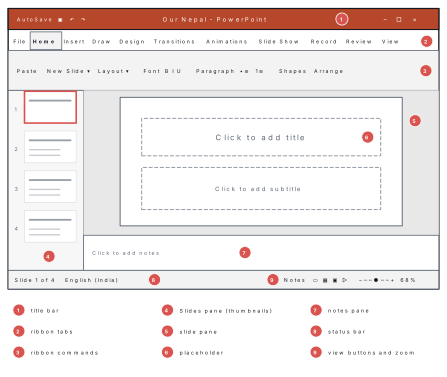
The ribbon of PowerPoint has the tabs File, Home, Insert, Draw, Design, Transitions, Animations, Slide Show, Record, Review, View and Help. New presentations use widescreen (16:9) slides; Design → Slide Size changes this to 4:3 if a projector needs it.
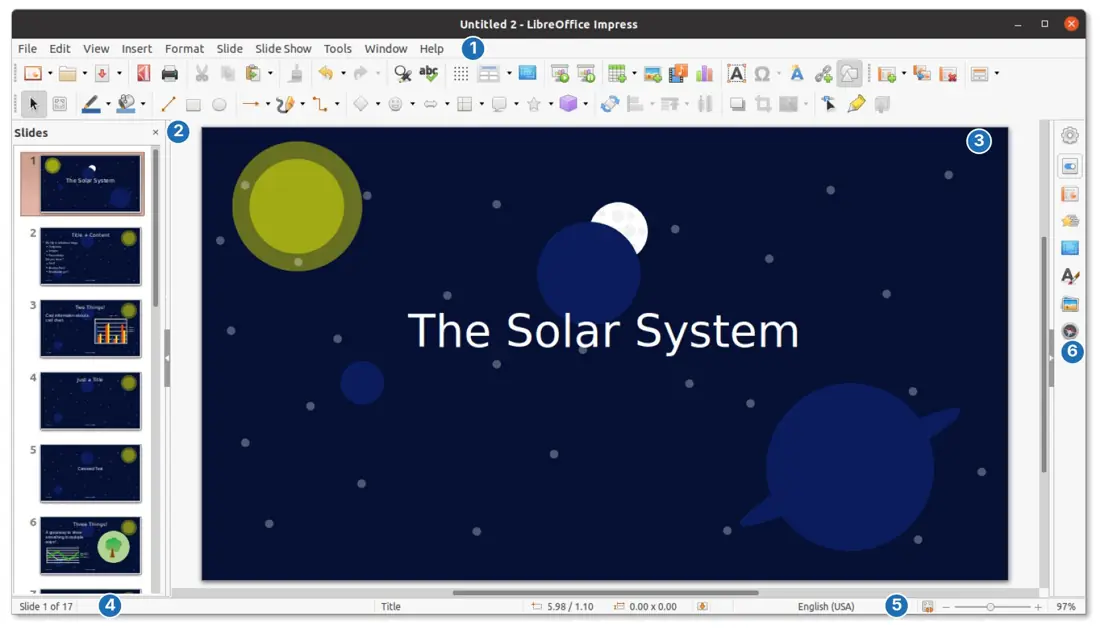
9.2 Creating a presentation: slides, layouts, themes and placeholders
A slide is one page of a presentation. A layout is the arrangement of boxes on a slide — for example a title with a list below it. A theme is a ready-made design — background, colours, fonts and effects — applied to all the slides together. A placeholder is a dotted box on a slide that holds a title, text, a picture, a table or a chart; it shows a prompt such as Click to add title until you fill it.
Steps to create a presentation
- Open PowerPoint and click Blank Presentation (or Ctrl + N). The first slide has the Title Slide layout. (Impress: File → New → Presentation.)
- Click in Click to add title and type the title; type your name and class in the subtitle placeholder.
- Home → New Slide (Ctrl + M) adds a slide; the arrow on New Slide lets you choose its layout. Home → Layout changes the layout of the current slide. (Impress: Slide → New Slide, Ctrl + M; Slide → Layout.)
- Design → Themes: click a theme for the whole presentation; Variants changes its colours, fonts and background. Microsoft 365's Designer (Design → Designer) suggests ready layouts for your content. (Impress: the Master Slides section of the sidebar.)
- Fill each placeholder: type text, or click the small icons in a content placeholder to insert a table, chart, SmartArt, picture, icon or video.
- Save with Ctrl + S: PowerPoint saves .pptx; Impress saves .odp (choose PowerPoint format to share with PowerPoint users).
Right-click a thumbnail in the Slides pane to Duplicate, Delete or Hide a slide; drag thumbnails up or down to reorder slides.
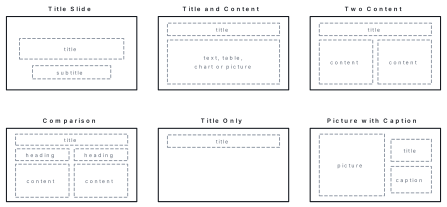
Problem. Ritika is making a presentation on Tourism in Nepal. Choose a layout for each slide: (a) the first slide with the topic and her name; (b) a slide with five points about trekking; (c) a slide comparing Pokhara and Chitwan side by side, each with a heading; (d) a slide with a big photograph of Lumbini and a short caption; (e) a slide that separates the "Problems" part of the talk from the "Solutions" part.
Solution. (a) Title Slide. (b) Title and Content (a bulleted list). (c) Comparison — two headings with content under each (Two Content would do without the headings). (d) Picture with Caption. (e) Section Header — a slide that introduces a new part.
9.3 Inserting text, pictures, tables, charts, audio and video
| To insert | PowerPoint | Impress | Tips |
|---|---|---|---|
| Text | type in a placeholder; or Insert → Text Box, then drag | Insert → Text Box | keep to short points |
| Picture | Insert → Pictures → This Device (also Stock Images, Online Pictures) | Insert → Image | resize from a corner handle so it is not stretched |
| Table | Insert → Table → choose rows × columns | Insert → Table | a few rows only; large type |
| Chart | Insert → Chart → choose a type → type the data in the small Excel sheet that opens | Insert → Chart → edit the data table | one message per chart |
| Audio | Insert → Audio → Audio on My PC (or Record Audio) | Insert → Audio or Video | set how it starts on the Playback tab |
| Video | Insert → Video → This Device (also Stock Videos, Online Videos) | Insert → Audio or Video | short clips; test before the show |
| SmartArt, icons, shapes | Insert → SmartArt / Icons / Shapes | Insert → Shape | diagrams instead of long lists |
Audio and video options. Click the inserted audio or video and open the Playback tab:
- Start: In Click Sequence or When Clicked On (plays when you click), or Automatically (plays as soon as the slide appears);
- Play Across Slides (keeps music playing through later slides) and Loop until Stopped;
- Hide During Show (for background music), Volume, Trim Audio/Video to cut the start or end.
A video or audio file that is inserted from the computer becomes part of the presentation. A video linked from the internet (Online Videos) plays only if the hall has internet. Before a school function, copy the presentation to a pen drive and test it on the computer that will be used — and keep a PDF copy in case the computer has an older program.
9.4 Transitions and animations
A transition is the visual effect when one slide changes to the next, such as Fade, Push or Wipe. An animation is a movement effect given to an object on a slide — a title, a bullet point, a picture — so that it appears, moves or disappears during the show.
Adding a transition
- Select the slide in the Slides pane. Transitions tab → choose an effect (Fade, Push, Wipe, Split, Reveal, Cover, Morph …).
- Effect Options sets its direction; Duration sets how long it lasts.
- Advance Slide: tick On Mouse Click, or After and type a time (for a self-running show).
- Apply To All gives the same transition to every slide.
(Impress: Slide → Slide Transition, or the Slide Transition section of the sidebar.)
Adding an animation
- Select the object (for example the text placeholder).
- Animations tab → choose an effect. The four groups are colour-coded: - Entrance (green): the object appears — Appear, Fade, Fly In, Zoom; - Emphasis (yellow): it draws attention while visible — Pulse, Grow/Shrink, Spin; - Exit (red): it leaves — Disappear, Fade, Fly Out; - Motion Paths: it moves along a line, arc or custom path.
- Effect Options (e.g. From Left, By Paragraph); Add Animation gives the same object a second effect.
- Timing — Start: On Click (waits for a click), With Previous (at the same time as the effect before it), After Previous (when the effect before it ends); Duration; Delay.
- Animation Pane lists all effects in order; drag to reorder.
(Impress: select the object → Format → Animation, or the Animation section of the sidebar.)
| Transition | Animation |
|---|---|
| effect between slides | effect on an object within a slide |
| applied to a slide | applied to text, a picture, a chart or a shape |
| one per slide | many per slide, in an order |
| Transitions tab | Animations tab |
| e.g. Fade, Push, Wipe | e.g. Fly In, Pulse, Fly Out, Motion Path |
Problem. A bank shows a 12-slide presentation on a TV in its waiting hall. Every slide is set to Advance Slide After 10 seconds, and the show loops. (a) How long does one full run take? (b) How many times does it run in an hour? (c) Which setting makes it loop?
Solution. (a) 12 × 10 = 120 seconds = 2 minutes. (b) 60 ÷ 2 = 30 times an hour. (c) Slide Show → Set Up Slide Show → tick Loop continuously until 'Esc' (and choose Browsed at a kiosk), so it repeats until someone presses Esc.
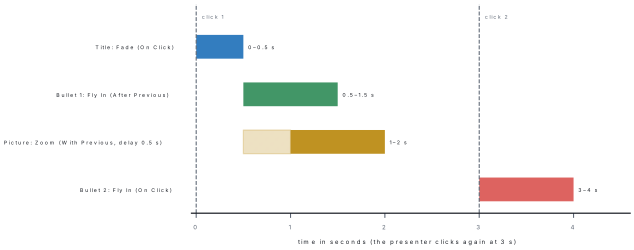
Problem. On one slide: the title has Fade, On Click, duration 0.5 s; bullet 1 has Fly In, After Previous, 1 s; a picture has Zoom, With Previous, 1 s, with a delay of 0.5 s; bullet 2 has Fly In, On Click, 1 s. Taking the first click as 0 s, when does each effect start and end? How many clicks does the presenter need to show everything?
Solution. The title starts at the first click: 0 to 0.5 s. Bullet 1 starts after the title ends: 0.5 to 1.5 s. The picture starts with bullet 1 (0.5 s) but waits 0.5 s: 1.0 to 2.0 s. Bullet 2 waits for a second click and then takes 1 s. So the presenter needs 2 clicks (and a third to move to the next slide).
9.5 Slide views, the slide master and running a slide show
Slide views
The View tab, and the small buttons on the status bar, switch between views (Impress: the View menu).
| View | What it shows | Used for |
|---|---|---|
| Normal | one slide large, with thumbnails and the notes pane | creating and editing slides (the usual view) |
| Outline View | the titles and text of all slides as an outline | typing and organizing the content quickly |
| Slide Sorter | small thumbnails of all slides in rows | reordering, deleting, hiding slides; setting transitions |
| Notes Page | the slide with its speaker notes below | writing and printing notes for the speaker |
| Reading View | the slide show inside a window | checking the show without full screen |
| Slide Show | slides full-screen, one at a time | presenting to the audience |
The slide master
The slide master is the top slide in a hidden set of master slides that stores the design of the presentation — background, fonts, colours, the positions of placeholders and items such as a logo or footer. A change made on the slide master appears on every slide that uses it.
View → Slide Master opens it: the large thumbnail at the top is the slide master and the smaller ones under it are its layouts. Change the title font, add the school logo or a footer there, then click Close Master View. (Impress: View → Master Slide; close with View → Normal.)
Problem. A 20-slide presentation needs the school logo in the top right corner of every slide, and later the title font must change from Calibri to Arial everywhere. Compare doing this slide by slide with using the slide master.
Solution. Slide by slide: the logo is inserted and positioned 20 times, probably not in exactly the same place, and the font is changed 20 times. With the slide master: the logo is inserted once and the title font changed once, and all 20 slides (and any new ones) follow it, in exactly the same position.
Running a slide show
- Slide Show → From Beginning (F5) starts at slide 1; From Current Slide (Shift + F5) starts at the selected slide. (Impress: Slide Show → Start from First Slide, F5.)
- Next slide or animation: click, Space, Enter, → or N. Previous: ←, Backspace or P. Type a slide number and press Enter to jump to it.
- B makes the screen black (press again to return); Esc ends the show.
- Ctrl + L shows a laser pointer and Ctrl + P a pen for writing on the slide.
- With two screens, Presenter View shows the speaker the current slide, the next slide, the notes and a timer while the audience sees only the slide.
- Rehearse Timings records how long you spend on each slide, and Hide Slide keeps a slide out of the show without deleting it.
9.6 Designing an effective presentation
A presentation supports a speaker; it does not replace one. People cannot read a long paragraph and listen at the same time.
Rules for effective slides
- Plan first: know your audience, your purpose and the 3–5 main points; sketch the slides on paper (a storyboard).
- One idea per slide, with a clear title.
- Keywords, not paragraphs. A common guide is the 6 × 6 rule: no more than about six points, each of about six words.
- Large, readable type: titles about 36–44 pt and body text at least 24 pt (never below 18 pt); one or two plain fonts.
- Strong contrast: dark text on a light background or light on dark; avoid red on blue and red on green.
- A consistent design: one theme, the same colours and the same transition throughout.
- Pictures and charts that explain; a chart is easier than a table of numbers. Give the source of pictures you did not make.
- Few animations: use them to reveal points one by one, not to spin and bounce.
- Check spelling, numbers and facts; add slide numbers; end with a summary or Thank you / Questions? slide.
- Rehearse with a timer: about one to two minutes per slide.
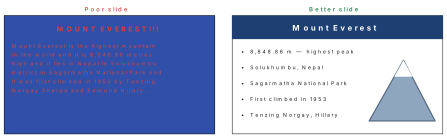
Problem. The "Poor slide" in the figure above has a title in capitals with three exclamation marks, a 64-word paragraph in red on blue at a very small size, and no picture. List its faults and describe a better slide.
Solution. Faults: a paragraph that the audience must read instead of listen; text far too small; red on blue has poor contrast; shouting capitals and "!!!"; no picture. Better slide: title Mount Everest; five short points — 8,848.86 m, highest peak; Solukhumbu, Nepal; Sagarmatha National Park; first climbed in 1953; Tenzing Norgay and Hillary — in 24 pt or more, dark text on a white background, with a photograph of the mountain. The speaker says the rest.
Make a five-slide presentation on Our District or Tourism in Nepal: a title slide; three content slides using different layouts, with at least one picture, one table or chart and one short audio or video clip; and a thank-you slide. Apply one theme and one transition to all slides, animate the bullet points of one slide, add the school name in a footer through the slide master, write speaker notes, rehearse timings, and present it to your group in under five minutes. Ask your listeners to check it against the ten rules above.
Ctrl + M new slide · F5 show from the beginning · Shift + F5 from the current slide · Esc end the show · B black screen · N / P next and previous. In a "steps" answer, name the tab: Transitions → Fade → Apply To All.
Chapter summary
- Presentation software (PowerPoint, Impress, Google Slides, Keynote, Canva) creates and shows slides; files are .pptx or .odp.
- A layout arranges placeholders on a slide (Title Slide, Title and Content, Two Content, Comparison, Title Only, Picture with Caption); a theme designs all slides; a placeholder holds a title, text or object.
- New slide Ctrl + M; insert pictures, tables, charts, audio and video from the Insert tab; the Playback tab sets how audio and video start.
- A transition works between slides (Transitions tab, Apply To All, Advance After); an animation works on objects (entrance, emphasis, exit, motion paths; On Click, With Previous, After Previous).
- Views: Normal, Outline, Slide Sorter, Notes Page, Reading View, Slide Show. The slide master changes every slide at once.
- Show: F5 from the beginning, Shift + F5 from the current slide, Esc to end; Presenter View for the speaker.
- Effective slides: one idea per slide, 6 × 6 rule, large type, strong contrast, consistent design, few animations, rehearse.
Practice questions
Group A — Objective (1 mark each)
- Which of these is presentation software? [1]aLibreOffice CalcbLibreOffice ImpresscNotepaddFirefox
- The default file extension of a PowerPoint presentation is [1]a.docxb.xlsxc.pptxd.odp
- A dotted box on a slide that shows Click to add title is a [1]athemebplaceholderctransitiondmaster
- The shortcut key to add a new slide is [1]aCtrl + NbCtrl + McCtrl + SdF5
- The effect when one slide changes to the next is a [1]atransitionbanimationclayoutdtheme
- An animation that makes an object appear on the slide belongs to the group [1]aExitbEmphasiscEntrancedMotion Paths
- The view that shows small thumbnails of all slides for reordering is [1]aNormalbSlide SortercNotes PagedReading View
- Pressing F5 in PowerPoint [1]asaves the filebstarts the show from the first slidecadds a slidedopens the slide master
- To put the school logo on every slide at once, use the [1]aslide masterbSlide SortercNotes PagedOutline View
- An animation set to After Previous starts [1]aon a mouse clickbat the same time as the previous effectcwhen the previous effect endsdat the end of the show
- According to the 6 × 6 rule, a slide should have at most about [1]asix slidesbsix points of about six words eachcsix picturesdsix colours
- A 15-slide show advances every 8 seconds. One run lasts [1]a23 sb1 minutec2 minutesd2 minutes 30 seconds
Answers to Group A
1. (b) — Impress is LibreOffice's presentation program.
2. (c) — .pptx; .odp is Impress's format.
3. (b) — a placeholder.
4. (b) — Ctrl + M.
5. (a) — a transition works between slides.
6. (c) — Entrance effects bring objects in.
7. (b) — Slide Sorter.
8. (b) — F5 runs the show from the beginning.
9. (a) — the slide master.
10. (c) — after the previous effect finishes.
11. (b) — six points of about six words.
12. (c) — 15 × 8 = 120 s = 2 minutes.
Group B — Short answer (2 marks each)
- What is presentation software? Name two examples. [2]
- Write any four features of presentation software. [2]
- Define slide layout and theme. [2]
- Differentiate between a transition and an animation. [2]
- Write the steps to apply the same transition to all slides. [2]
- Write the steps to insert a video stored on the computer into a slide. [2]
- What is the slide master? Why is it useful? [2]
- Name four views of PowerPoint and write the use of any two. [2]
- Write the keys used to start a slide show from the beginning, start from the current slide, show a black screen and end the show. [2]
- Write any four rules for making effective slides. [2]
Answers to Group B
1. Presentation software is application software for creating slides with text, pictures, charts and multimedia and showing them one after another to support a talk. Examples: Microsoft PowerPoint, LibreOffice Impress, Google Slides (any two).
2. Any four: layouts and themes; placeholders; pictures, tables, charts, audio and video; transitions and animations; several views; slide master; speaker notes and Presenter View; rehearse timings; export to PDF or video.
3. A slide layout is the arrangement of placeholders on a slide, such as Title and Content. A theme is a ready-made design of background, colours, fonts and effects applied to all the slides.
4. A transition is the effect when moving from one slide to the next and is set on the Transitions tab; an animation is an effect on an object (text, picture) within a slide and is set on the Animations tab. A slide has one transition but may have many animations.
5. Select a slide → Transitions tab → click an effect such as Fade → set Effect Options and Duration → click Apply To All.
6. Select the slide → Insert tab → Video → This Device → find and select the video file → Insert; then set Start (On Click or Automatically) on the Playback tab.
7. The slide master is the top master slide that stores the design of the presentation — background, fonts, colours, placeholder positions, logo and footer. It is useful because a change made on it appears on every slide at once, saving time and keeping all slides consistent.
8. Normal, Outline View, Slide Sorter, Notes Page, Reading View, Slide Show (any four). Normal — editing one slide; Slide Sorter — reordering and deleting slides; Notes Page — writing speaker notes; Slide Show — presenting full screen (any two uses).
9. F5 — from the beginning; Shift + F5 — from the current slide; B — black screen; Esc — end the show.
10. Any four: one idea per slide; keywords not paragraphs (6 × 6 rule); large type (title 36–44 pt, body at least 24 pt); strong contrast between text and background; one consistent theme; relevant pictures and charts; few animations; check spelling; rehearse.
Group C — Long answer (4 marks each)
- Write the steps to create a four-slide presentation on "Tourism in Nepal" with a title slide, a picture, a table and a transition on every slide. [4]
- Explain the four types of animation effect and the three ways an animation can start. [4]
- Describe any four slide views with the use of each. [4]
- On a slide, the title has Fade (On Click, 1 s), a picture has Zoom (After Previous, 1.5 s) and a caption has Fly In (With Previous, 1 s, delay 0.5 s). Taking the click as 0 s, find when each starts and ends, and when the slide is fully shown. [4]
- Your friend's slide has a full paragraph in 12-point yellow text on a white background, three different fonts and a spinning animation on every word. Explain four problems and how to correct them. [4]
Answers to Group C
1. Open PowerPoint → Blank Presentation. Slide 1 (Title Slide): type Tourism in Nepal and your name. Ctrl + M for slide 2 (Title and Content): type four points about tourist places. Ctrl + M for slide 3: Insert → Pictures → This Device → choose a photo of Pokhara → Insert, and add a title. Ctrl + M for slide 4: Insert → Table → 3 columns × 4 rows, type the places, districts and attractions. Design → choose a theme. Transitions → Fade → Apply To All. Save (Ctrl + S) as Tourism in Nepal.pptx and press F5 to check.
2. Entrance (green) — the object appears, e.g. Fly In, Fade. Emphasis (yellow) — draws attention while visible, e.g. Pulse, Spin. Exit (red) — the object leaves, e.g. Fly Out, Disappear. Motion Paths — the object moves along a line, arc or custom path. Start options: On Click — waits for a click; With Previous — starts together with the previous effect; After Previous — starts when the previous effect ends.
3. Any four. Normal — one slide large with thumbnails and notes, for creating and editing. Outline — the text of all slides as an outline, for writing content. Slide Sorter — thumbnails of all slides, for reordering, deleting, hiding and setting transitions. Notes Page — the slide with its notes, for preparing the speaker's notes. Reading View — the show in a window, for checking. Slide Show — full screen, for presenting.
4. Title: starts at the click, 0 to 1 s. Picture (After Previous): starts when the title ends, 1 to 2.5 s. Caption (With Previous, delay 0.5 s): starts with the picture at 1 s, waits 0.5 s, so 1.5 to 2.5 s. The slide is fully shown at 2.5 s.
5. (1) A full paragraph — the audience reads instead of listening; use 4–6 short points. (2) 12-point text — too small to read from the back; use at least 24 pt. (3) Yellow on white — poor contrast; use dark text on a light background. (4) Three fonts — looks untidy; use one or two plain fonts. (5) Spinning animation on every word — distracting and slow; use a simple entrance such as Appear or Fade by paragraph, or none. (Any four.)
Practise more: Computer Science question bank